Hey there my friends! Thanks for joining the Inspiration Team today on our weekly blog hop. We feature the Brutus Monroe Subscription items across the hop. My project comes from the Special Delivery Inspiration Box! The theme of the box is snail mail and comes with a huge stamp set of mailboxes, envelopes, and sentiments. The box includes gorgeous layering cardstock, kraft envelopes, glassine envelopes, an exclusive Plum Aqua Pigment (which I need more of or I don’t know how I’ll survive), foiling card panels, stickers, an embossing folder, ribbon, and an exclusive enamel pin with a snail mail theme! I hope you can get your hands on this box, and if not, some of the items will be in the online shop for sale separately.
Read moreBrutus Monroe Inspiration Team Blog Hop - Dies
Hey there!! Daniel here with a birthday card using the Happy Birthday dies from Brutus Monroe and some other exciting products including the stencil of the month for February 2019 and the Daffodil Chromaglaze.
Read moreWelcome Home Catherine Pooler February 2019 Release
Hey there! Great to have you stop by today! I wanted to share this card with you from the Catherine Pooler Welcome Home Release from February 2019. You can see the release here!
For this card, I used Aqua Pigments from Brutus Monroe to create a background of Violet and Blue Green. I dropped some of this liquid water color onto my glass mat and dragged some watercolor paper through it. After the paper dried, I cut it down to a circle and adhered it to a card base I made from Catherine Pooler White Cardstock.
Read moreWelcome Home Catherine Pooler February 2019 Blog Hop
A big hello to all my friends celebrating the Welcome Home February 2019 release from Catherine Pooler Designs by blog hopping today. Daniel West here with a few cards to highlight the whimsical designs of this beautiful collection of stamps and dies.
I have included a list of the entire hop for today below. Leave a comment on each blog! With each comment you have an entry to the drawing for $25 to shop Catherine Pooler Designs.
Read moreSurface Inks Funny Easter Card
Hello! Welcome to my Surface Inks Blog Hop Post for the Brutus Monroe Inspiration Team. I have a humorous Easter Card for you today based on a funny chocolate bunny meme from the web. I used the Stamp of the Month set, which includes a chocolate bunny and a marshmallow bunny to recreate the little funny post.
Read moreCardstock Warehouse and the January 2019 My Monthly Hero Card Kit
I made this card using cardstock from Cardstock Warehouse! The stamps and dies are all from Hero Arts. There’s a bit of Copic coloring and some heat embossing using Brutus Monroe Alabaster Embossing Powder!
Read moreSt Patrick's Day Lovely Legs Card
Happy St Paddy’s Day to ya! I made this card using the Lovely Legs Leprechaun Stamp Set from Colorado Craft Company. I used Tim Holtz Distress Oxide Inks to blend up the background and Gilded Embossing powder from Brutus Monroe for the heat embossed sentiment.
Read moreEaster Blessings Lovely Legs Card
This powerful image comes from the Lovely Legs Easter Blessings Stamp Set from Colorado Craft Company. I used Kristina Werner’s oxide blending tips for the background and Copic markers to color in the foreground. Happy Easter to all my Christian friends!
Read moreBrutus Monroe Inspiration Team Blog Hop - Shining Shimmering Splendid
Hi there!! Welcome to my shiny piece of the Shining Shimmering Splendid Blog Hop Today!
For the shiny part of my card, I used Brutus Monroe’s fabulous new Chroma Glazes in Daffodil and Sapphire. These glazes compare with Glitter Glazes, but without the glitter! They spread like mayo over paper and blend beautifully.
Read moreLovely Legs Sympathy
Lovely Legs Sympathy Stamp Set has a moving image of a girl in the rain. I made this one using an Aqua Pigments smooshed background and embossing powder from Brutus Monroe.
Read moreOxide Color Combo and Concord and 9th Faceted Stencil
Kristina Werner has started a new series on color combos that I am LOVIN’ !!! Thank you! ! I created this card using one of her featured Distress Oxide combos — Seedless Preserves, Abandoned Coral and Tattered Rose. The stencil is called Faceted by Concord & 9th.
Read moreArteza and Concord and 9th Valentine

Hi! Welcome to my blog. I’m glad you’ve stopped in today!
This week Kristina Werner did a video on Youtube using Arteza Real Brush Pens to water color a floral design. This inspired me to break out my Artezas and my Concord & 9th Just Love stamp set and get to work.
I stamped the main image out on an A2 size panel of Bristol Smooth Cardstock using Midnight Ink from Catherine Pooler. This cardstock works well with Arteza Real Brush Pens because it has a very smooth, tight surface. Color takes a little more time to absorb into its fibers making this cardstock ideal for light watercoloring and intense ink blending techniques.
I colored in the image with lighter colors at first, using a fairly loose hand. I did not pay too much attention to the lines. Then I added some darker colors for shading and loose detail. I even added some drops of white enamel dots on top of some of the flowers.
I stamped the LOVE image with Midnight ink and gave the word a shadow with Arteza markers and a grey Copic marker.
Read moreBrutus Monroe Inspiration Team Blog Hop - Favorite Techniques
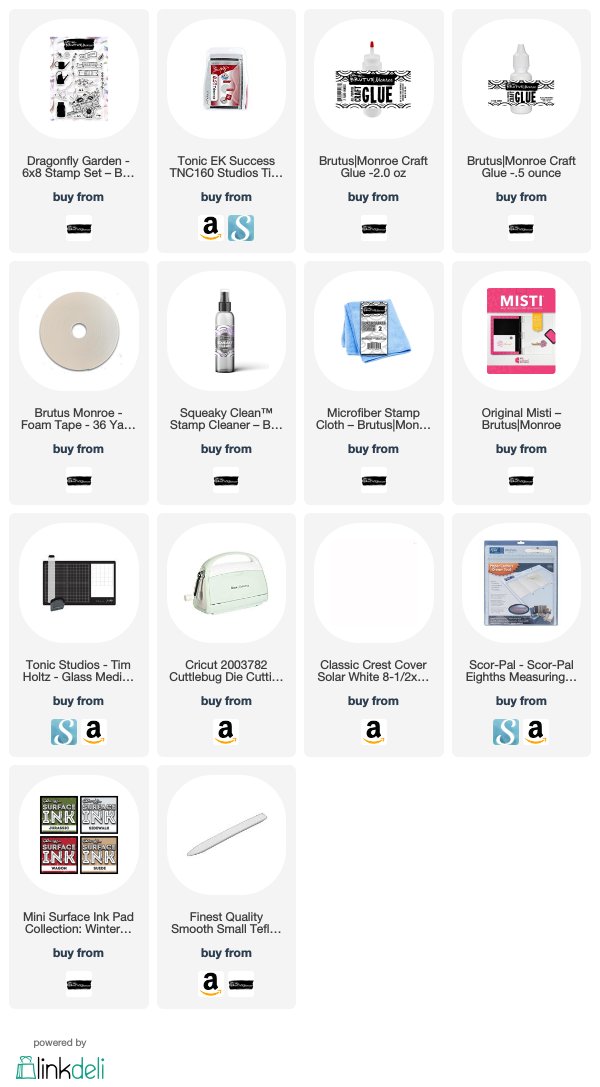
Hi Everyone!! Daniel here with a card featuring one of my favorite techniques for cardmaking — heat embossing. Today the Brutus Monroe Inspiration Team hops along to their favorite techniques using B|M subscription items.
Brutus Monroe offers sever amazing, shipping-included subscriptions that will knock your socks off. If you subscribe to any one of these clubs, you will receive an automatic 15% discount off regularly priced B|M merchandise on future purchases! Now that’s whistle-worthy! B|M has subscriptions that feature a monthly stencil, a stamp, an embossing powder, a glitter glaze and the amazing Inspiration Box!
Read moreBrutus Monroe Inspiration Team Blog Hop - ATC's
I just learned about Artist Trading Cards this month, actually. But I quickly came to enjoy making them. ATCs come in a wallet size 2.5 x 3.5 inch card for easy trading with other artists. I made a variety of them for this hop inspired by the Valentine theme for this season. I will give you step by step instructions for them here, with individual supplies lists. Let’s dive right in:

FOR MY LOVE
The read ATC that with the “For My Love,” sentiment came from a background I did a while back for a Christmas card with huge berries made of Nuvo Drops. I kept the extra water pigment colored panel and trimmed it down to ATC size. Then i stamped it with B|M Embossing Ink and heat embossed it with Conversation Heart embossing powder and then with Gilded embossing powder. I used a little die from Concord and 9th to add embossed hearts in a row above the sentiment.
LOVE NOTE
For my second ATC, I used the January Stencil of the Month and the Glitter Glaze of the month: Flamingo to make a stenciled heart of hearts. Then I trimmed down the heart to ATC sized cards. I foiled one of the hand written note toner sheets with Copper DecoFoil and fussy cut it around the shape of the Glitter Glaze Heart. I adhered the foiled pieces to the bottoms of the ATCs to finish them off.
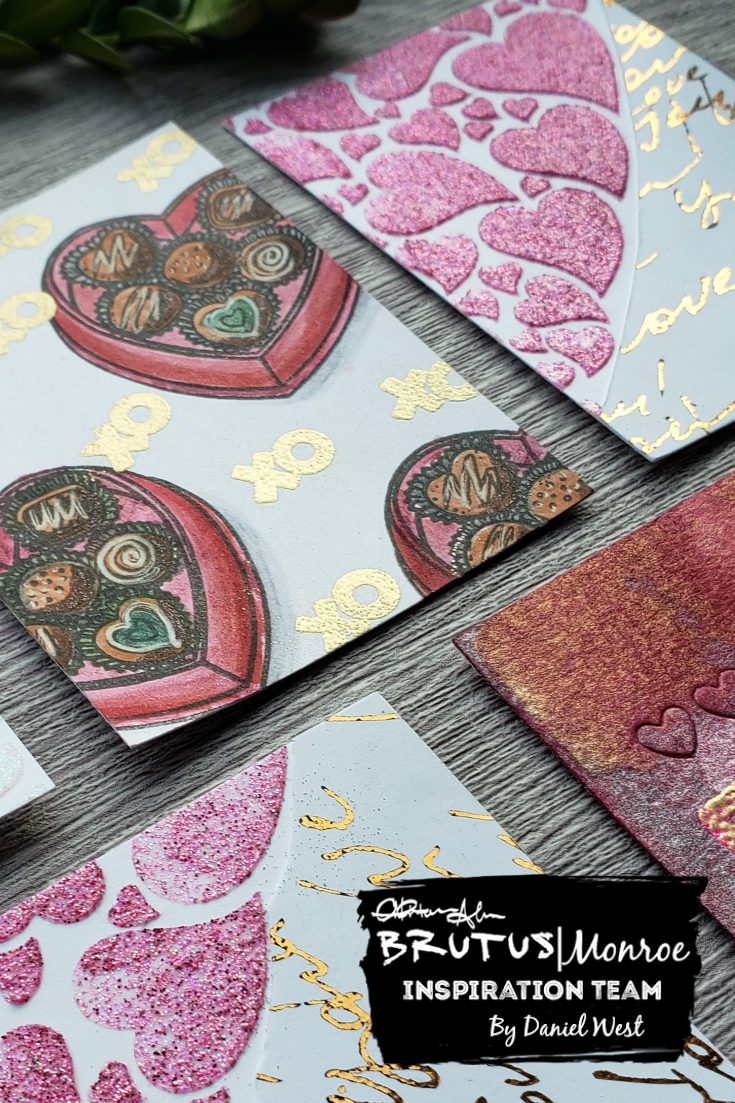

For the last one I am witing about today, I used the Chocoloate Box Sfamp of the Month. I stamped the image repeatedly wth Raven ink. Then I colored it in with Surface inks and an Aqua Pogment water brush. I added some details with a whige getl pen. I finished it off with the XO image heat embossed in the white spaces using Gilded Embossing Powder.
Thank you for joining me on the Blog Hop today. You can continue the hop with the list below:
DANIEL (you are here)
Foiling a Toner Sheet You Printed

Charleston Lovely Legs Stamp Set for Colorado Craft Company by Daniel West
Hi there!! Did you know you can foil a toner sheet you printed yourself? Saturday morning I woke up at 4:30AM to play in my crafting workspace and decided to create a shiny gold background for the Charleston Stamp Set from Colorado Craft Company’s Lovely Legs line.
I have made the image downloadable in my shop. (Please navigate there by clicking shop in the menu of this page. I’d give you the link, but I’d like you to try out my new shop link in the menu dillybob [I'm stickler for techie language]. Let me know how easy it was for you to navigate the checkout process. You can skip the billing information area by leaving it blank and clicking continue. Please use code: IAMARTIE to take 100% off the price.)
In order to make the image foilable with DecoArt foils, you will need to print it with a laser printer—an inkjet printer will not work for this. You may take the image to an office supply store to have them print it. Make sure you print in black and at your highest quality setting.
Place your a foil transfer sheet from DecoFoil over the printed image and cover both sides of your project with parchment paper. Run it through a hot laminator. Peel off the foil from the image and you have a beautifully foiled Art Deco background to use with your Charleston Lovely Legs Stamp.
I hope you enjoyed this little tip and freebie. If you would like to purchase the Charleston Lovely Legs Stamp Set, I have included affiliate links below. When you use these links, I will receive a portion of your total purchase at no additional cost to you!
Brutus Monroe Glitter Drops Blog Hop
Hey everybody!! Great to have you here with me today! The B|M Inspiration Team’s blog hop this week features the Glitter Drops! So many fantastic projects to ogle over this week, don’t miss a single post!
I made a background with my Silver Glitter Drops and the Stencil of the Month for January. Check out my pics!


These step-by-step instructions will help you recreate the card. Go ahead and make it your own by switching out colors, stamps, and cardstocks!
Trim down a panel of white cardstock to 4.25 x 5.5 inches.
Roll up a piece of masking tape and stick it on the back of the panel and temporarily adhere it to your glass mat.
Tape the January Stencil of the Month over the top of the panel at an angle.
Squeeze a good amount of Silver Glitter Drops onto the panel and spread it thinly over the stencil with a spatula or tool.
Peel up the stencil and put the panel aside to dry for about 15 minutes.
Stamp the panda, speech bubble and sentiment onto to some white cardstock using Raven Detail Ink, masking the heart out of the Panda.
Fussy cut them out and pop them up onto a black belly band about 1.5 inches wide and the entire wide of the card.
Pop up the belly band with some foam tape.
Draw a little heart onto the panda with a pencil and color it in with a red marker.
Adhere the entire panel onto the front of an A2 card base.
Thanks again for stopping by. I hope you enjoyed this card. If you are inspired to use any of these products, please visit my supplies grid below and use my affiliate links to make your purchases! I will receive a small amount of the purchase price at no additional cost to you!
And please continue the hop… the links are below the grid!

Catherine Pooler Designs Stamp of Approval Blog Hop Jan 2019
A big hello to all my friends celebrating the Adoring You Stamp of Approval release by blog hopping today. Daniel West here with a few cards to highlight the beauty and versatility of this incredible collection of goodies.

]Catherine Pooler Designs releases a Stamp of Approval collection every quarter. Past Stamp of Approval releases knocked my socks off!! The Adoring You Stamp of Approval box comes chock full of versatile, timeless and well-crafted items valued at over $100. It comes with new stamp sets put together just for this release. You will not find these sold separately for many months.
The Adoring You Stamp of Approval will have you making Valentine’s and love notes all year. All of the stamp sets coordinate to present endless opportunities for fun at your craft desk. I have a few examples to show you below and will have more over the next few days on my Instagram and Facebook accounts (so be sure to follow me there).

Catherine Pooler Designs Adoring You Stamp of Approval Card by Daniel West
For my first example, I used the 6x6 Love Note Background Stamp and the Sweet Home Wreath Stamps. On some Catherine Pooler White Cardstock, I stamped the vine wreath image using Icing on the Cake. On a piece of white cardstock, I stamped the vine wreath image using Icing on the Cake Ink. I stamped over that image with the coordinating leaf wreaths using Flirty Fuchsia Ink and Sweet Sixteen Ink. I really enjoy how Catherine Pooler Inks work together with such ease.
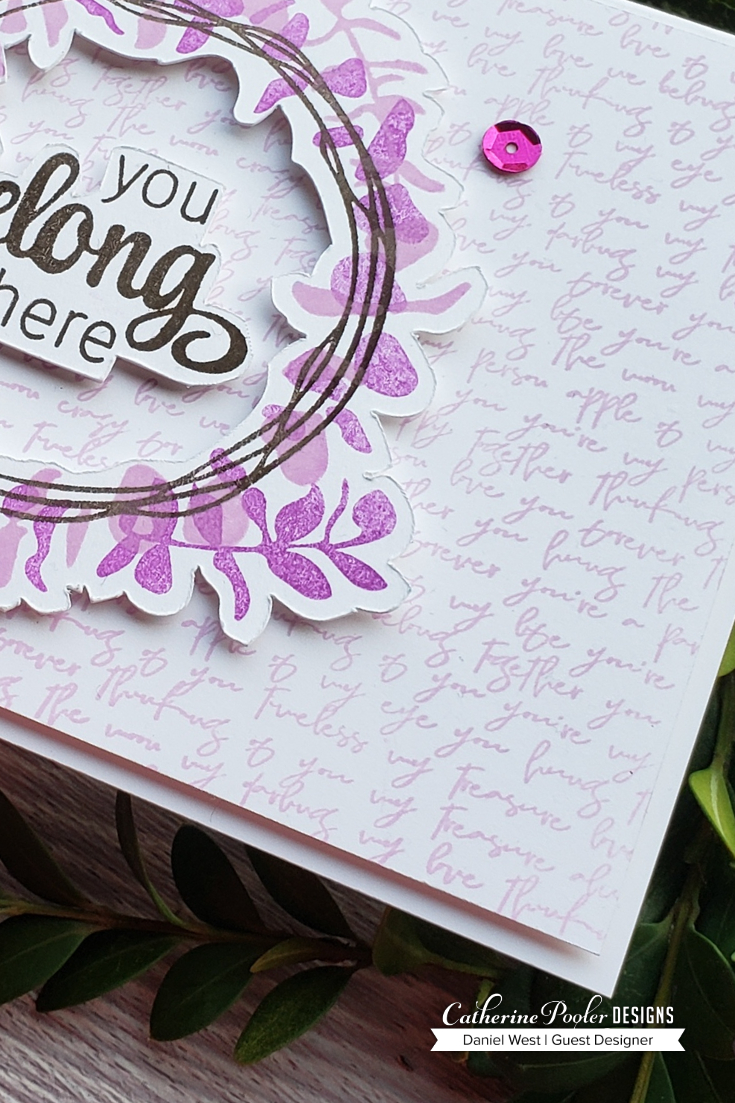
Catherine Pooler Designs Adoring You Stamp of Approval Card by Daniel West
I used a machine to scan and cut out the image of the wreath and the sentiment. I popped them up on foam tape and mounted them on a panel I had stamped with the Love Note stamp using Sweet Sixteen ink. I added foam tape to the back of that panel, as well, and finished off the card with three fuchsia sequins.

Catherine Pooler Designs Adoring You Stamp of Approval Card by Daniel West
For my second card, I felt like leaving wintry colors behind and heading for warmer climates. I went for some Tiki Torch, Samba, Suede Shoes, It's a Boy, Icing on the Cake Inks. I stamped the sentiment, Love You, using Icing on the Cake, in the bottom left of a card base. Then I covered the sentiment with Unicorn Magic embossing powder used a heat tool to melt the powder.
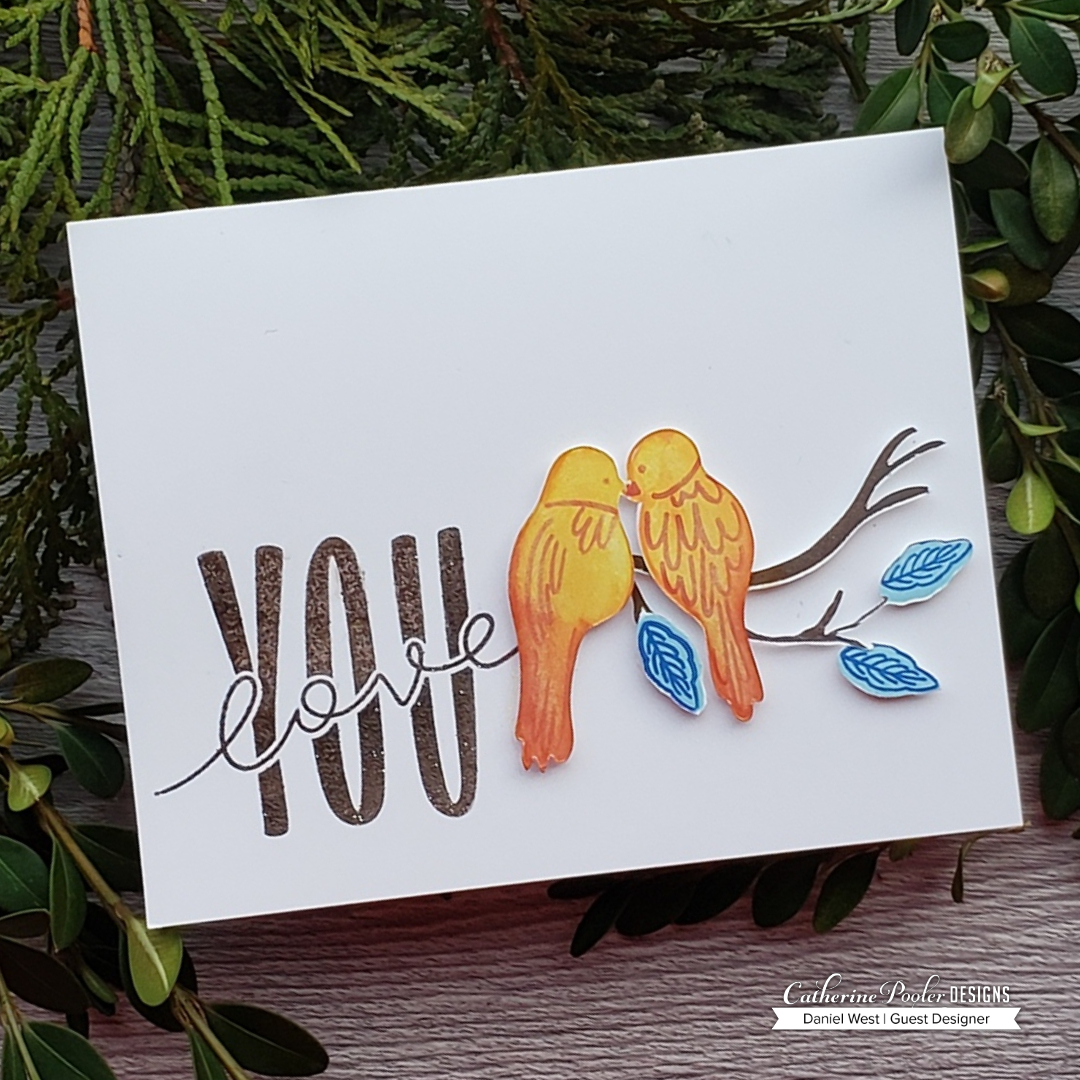
Catherine Pooler Designs Adoring You Stamp of Approval Card by Daniel West
Then on I stamped the two love birds beak to beak using Tiki Torch ink for the background color and Samba for the detail stamp. I stamped the branch with Icing on the Cake, and the leaves with two blues: Suede Shoes and It’s a Boy inks. I ran these images through my Scan n Cut machine and set them aside.
Using an ink blending brush, I blended some Samba Ink onto the birds from the bottom up and around the edges. Then I adhered the birds and leaves onto the branch and popped them all up on foam tape.

Catherine Pooler Designs Adoring You Stamp of Approval Card by Daniel West
If you want to get in on this quarter’s Stamp of Approval, you need to add your name to the waitlist now to get first notice of the sales link, as these collections sell out fast. I have a feeling this one may go even faster.
Please let me know what you think of this month’s release and my cards in particular in the comments section below. Two random winners will be chosen from commenters on the blog hop to receive $25 gift certificates from Catherine Pooler Designs. Be sure to visit Catherine’s blog for more release photos and details about the release pajama party.
I have included a supplies grid below that include affiliate links. If you use my links to make a purchase, I will dance at your wedding and you will never forget that!! Actually, I will receive a small percentage of your purchase total at no additional cost to you.
Thanks for spending some time with me today. Now go shopping and go hopping!! You’ll find the links to the rest of the hop below my supplies grid.
Simon Says Stamp Card Kit January 2019 Quickie
Hi there! Thanks for stopping by. Daniel here with a quick card from the Simon Says Stamp Card Kit for January 2019. I unboxed this kit live on my YouTube channel and immediately wanted to make a card. So I did it live and unplanned on my channel. You can watch the video below.
Step-by-Step Instructions:
Cut the white cardstock from the kit in half to form two 8.5 x 5.25 pieces.
Score one of the pieces at 4.25 inches and tape it down to your glass mat with some masking tape at the score line.
Cut a wavy line out of some plain copy paper to make a hills mask for ink blending
Using an ink blending tool (I use the Picket Fence Life Changing Brushes), brush on some Tumbled Glass over your hill stencil about halfway up the front of the card base.
Repeat this step using Salty Ocean Distress Ink about two inches lower.
Stamp the large penguin on to the panel using an acrylic block and Midnight Ink from Catherine Pooler. This ink gives a solid impression on your first pass. I can’t say enough good things about it.
Stamp off the remaining in onto some plain copy paper and cut it out for a mask with some fussy cutting scissors.
Place your mask over your large stamped penguin image and stamp the small penguin image twice - once on each side of the large penguin using the same Midnight Ink.
Add a sentiment from the stamp set using Midnight Ink at the bottom right of the card.
Stamp a three of the tiny plus signs around the sentiment and voila!!! you are finished.
Thank you again for joining me today. I really appreciate it. If you’re feeling inspired by this card and would like to purchase any of the supplies I used, I have created a supplies grid below. By clicking on these links and purchasing through my links, you are keeping Del & Artie alive! :D . I will receive a small percentage of your purchase total at no additional cost to you!
Lovely Legs January 2019 Release Charleston
Hey there everyone!! I'm so glad you've stopped by today. I'm celebrating with Colorado Craft Company because today they released a new set of Lovely Legs Stamp Sets.
I made a card with the Charleston Stamp Set. It features a flapper and her dance partner doing the Charleston.

1. I used Cardstock Warehouse Dark Grey 100 lb cardstock for the panel.
2. I ran it through a die cutting machine with the HeroArts Star Confetti Die.
3. I stamped the dancers on a piece of Bristol Smooth Cardstock using Gina K Amalgam Ink.
4. I colored in the image with Copic markers.
5. I ran the image through my Brother Scan N Cut machine to cut out the colored in image.
6. I heat embossed a sentiment from the set using Alabaster Embossing Powder from Brutus Monroe on a strip of the Dark Grey cardstock.
7. I blended the edges of the die cut panel with Life Changing Ink Blending Brushes and Black Soot Distress Ink.
8. I popped up the sentiment strip on some foam tape, then added some double thick black foam tape from Brutus Monroe to the dancers.
9. I glued the front panel onto an A2 sized card base I cut from a sheet of 100 lb Sweet Tooth Cardstock from The Cardstock Warehouse.
I hope you enjoyed my card today. If you would like to purchase any of these supplies, I have included a grid below for your convenience. These are affiliate links, so you will be helping me out by using them at no additional cost to you.
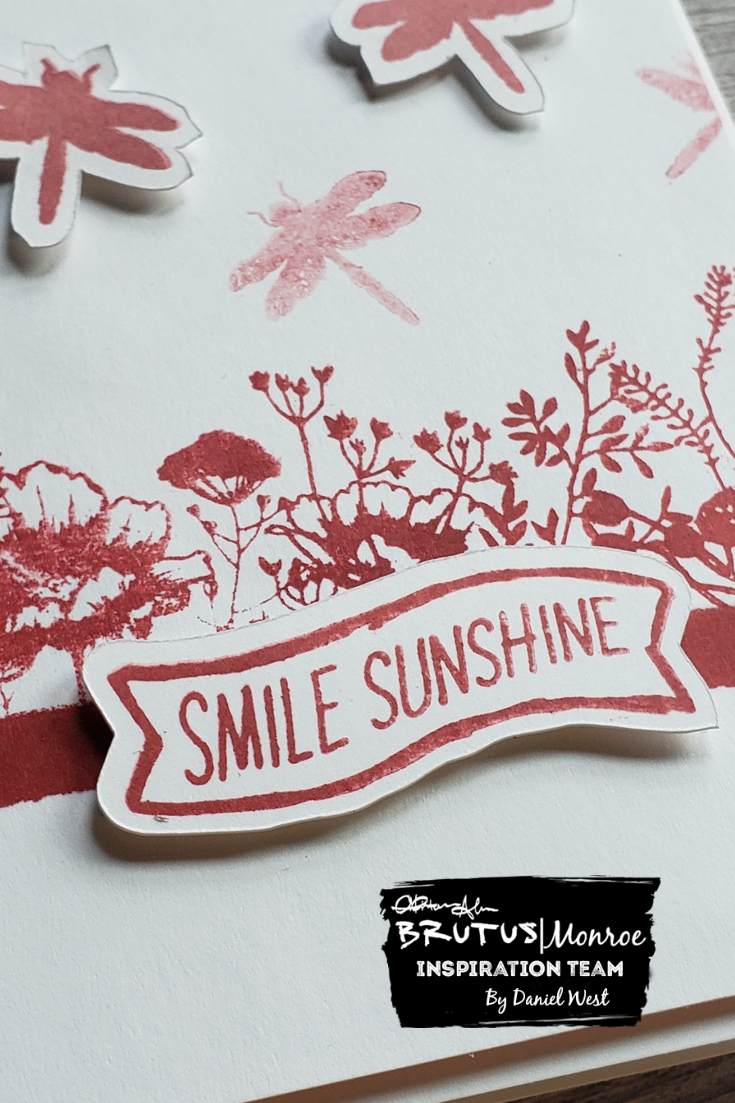
Brutus | Monroe Monochrome Blog Hop
Hey everybody!! I’m glad you hopped in today to see this week’s Brutus | Monroe Blog Hop. Today we focused on using a monochrome palette and I chose Scarlet Surface Ink as my color.
I made this card live on my YouTube channel, New Year’s Eve, so you can watch the “making of” here.


Step-by-step Instructions:
Cut a sheet of Neenah Classic Crest Solar White 110 lb cardstock in half and score at 4 1/4” to make an A2 size card base.
Cut a panel out of the other half to 4 x 5 1/4”.
Cut a piece of craft foam to just fraction smaller than the panel in step # 2.
Ink up the flower portion of the wagon image from the B|M Dragofly Garden stamp set using the Scarlet Surface Ink from the December 2018 Inspiration Box.
Stamp your panel about a third of the way up with the flowers. Stamp again to fill the panel from left to right.
Place some purple crafting tape at the bottom of your stamped image and place another piece of tape about a quarter inch below that one. Run your Scarlet ink cube directly over the gap to create a ribbon going across the panel.
Stamp the dragonfly image with Scarlet ink on scrap piece of cardstock then stamp it again with the 2nd generation ink onto the front of the panel. Repeat this two more times. You will have three lighter hued dragonflies across the front of the panel. This adds some depth to your card design.
Stamp the Smile Sunshine image onto the same scrap paper as the dragonflies using Scarlet ink.
Cut out the dragonflies and banner with fussy cutting scissors or a Scan N Cut machine.
Glue your panel onto the craft foam with some Brutus Monroe All Purpose Craft Glue.
Adhere the foamed panel to your card base with the same glue.
Pop up your banner and 2 of your dragonflies onto the front of the card panel and you are finished.
Thanks again for joining me today. I hope you will hop along with the rest of the team to see what everyone else made using a monochromatic palette!
If any of the supplies I mentioned interest you, I have included a list of them below for your convenience. These links are affiliate links and I receive a small percentage of the price you pay at no additional cost to you. This helps Del & Artie to continue to provide inspiration to you!