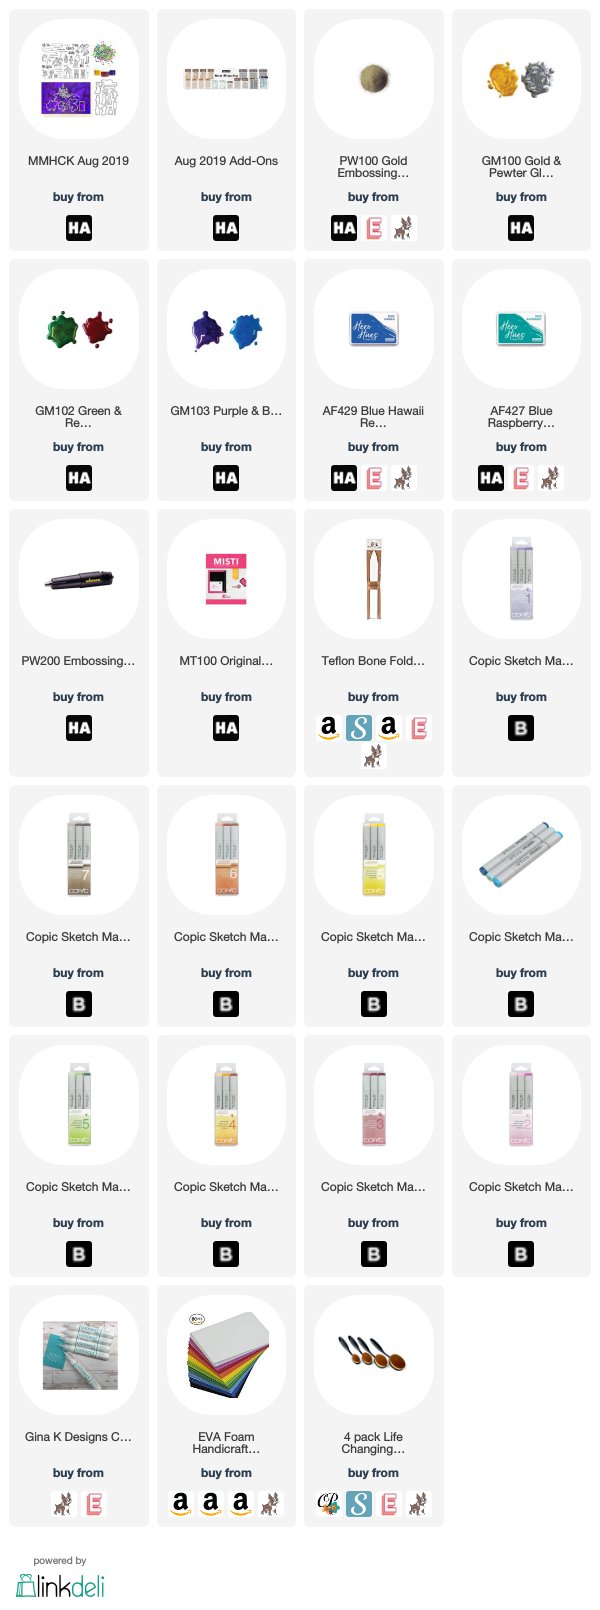
Hey there Artie!! Great to see you again today. Welcome to Del & Artie’s segment of the Hero Arts August 2019 My Monthly Hero Blog Hop and Giveaway! What a thrill to have the honor of sharing this month’s kit with you on launch day! I subscribed to this kit 13 months ago and look forward to playing with it every month. You can see some of my shenanigans in my Instagram feed and here at Del + Artie! For today’s cards, I used only the main kit! No add-ons were harmed in the making of these cards! Actually, I don’t have the add-ons, but can’t wait to get my hands on them.
Giveaway:
We will give away one kit, drawn from the comments left across the hop. Enter by Sunday, August 11th at 11:59pm pacific, and the winner will be announced on the Hero Arts blog the following week.
Kit Contents:
This kit is valued at over $83 and sells for $34.99. You get so much packed into the kit every month and they are always a load of fun!! This month you will receive:
6" x 8" Clear Stamp Set
17 Coordinating Frame Cuts
1 Fancy Castle Die
2 5.5" x 8.5" sheets of Mirri Matte Lava Purple Paper
2 5.5 x 8.5" sheets of Parchment Paper
3 Glimmer Ink Pots (Gold, Purple, Red)
Dragon Scale Sequins

Card #1 - Fiery Glimmer Ink Background
My first card, today, highlights the beautiful Glimmer Inks included in the kit! I used the Gold and the Red here. I spent a good hour playing with the inks and watercolor paper and made at least ten backgrounds. You can watch an abbreviated session of the same process below!
I wet the watercolor paper, spread out some Glimmer Ink on my glass mat and dipped each end into a different color. I stood the panel on one end and let gravity and water do the work of pulling the ink toward the bottom. This produced a fiery effect that I really enjoyed. So I dried the panel and decided to use it as the background for a knight vs. dragon scene.

Next, I trimmed down the fiery panel to about four inches tall. Then, I adhered it to some black cardstock and trimmed that down to leave a border on the top and bottom of the panel. i created a white A2-sized card base and glued the fiery background to the front of it.

From there, the card came together very easily. I stamped the knight and dragon images out on white cardstock and colored them in with warm Copic colors. Then, I die cut them out along with some fun foam using their coordinating dies and adhered them together. I popped them onto the front of the fiery panel.
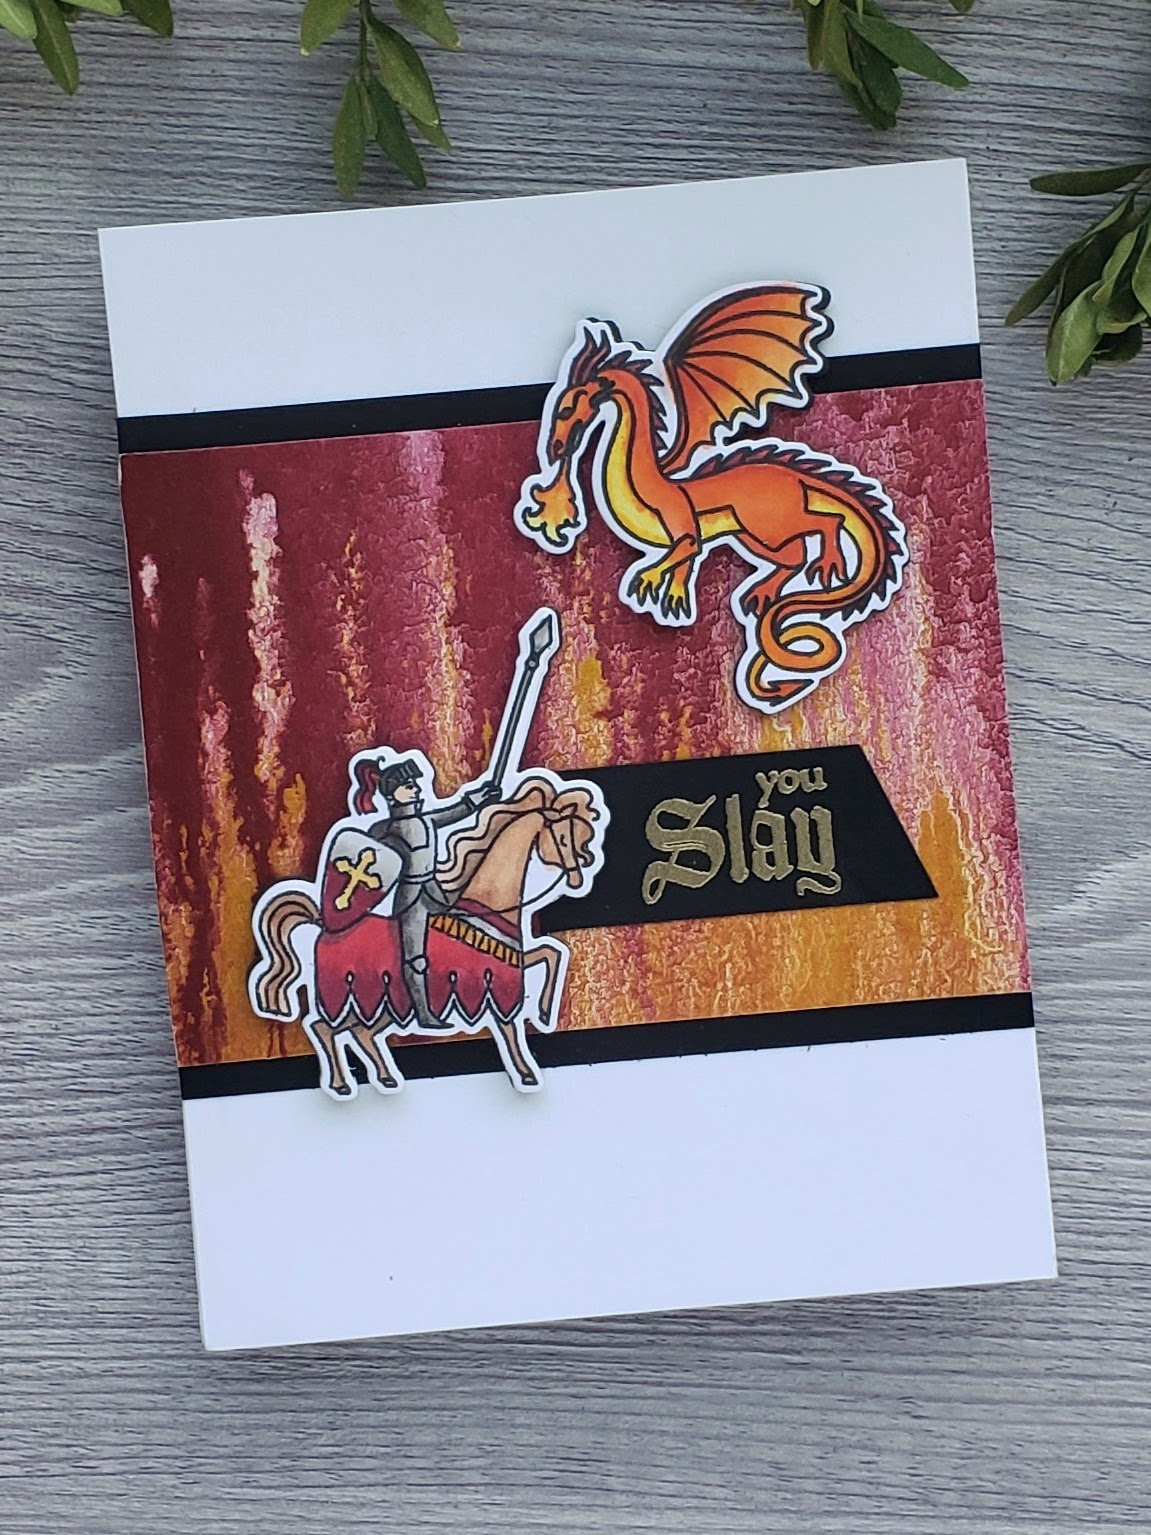
Finally, I heat embossed a sentiment from the kit onto some black cardstock using gold embossing powder. I trimmed down the strip with an angle on the end and tucked it under the knight’s horse to finished the card!
Card #2 - Hero Hues Reactive Evening Sky
For my second card, I opened up my brand spanking new Hero Hues Reactive Inks and set out to create some blends with them. I found these inks perfectly blendable. They squish out on my glass mat easily and feel wetter than other hybrid inks. I blended up several backgrounds and chose one of them I created using Blue Hawaii and Blue Raspberry. Then, I sprinkle a bit of water over the panel to create some stars and let it dry.
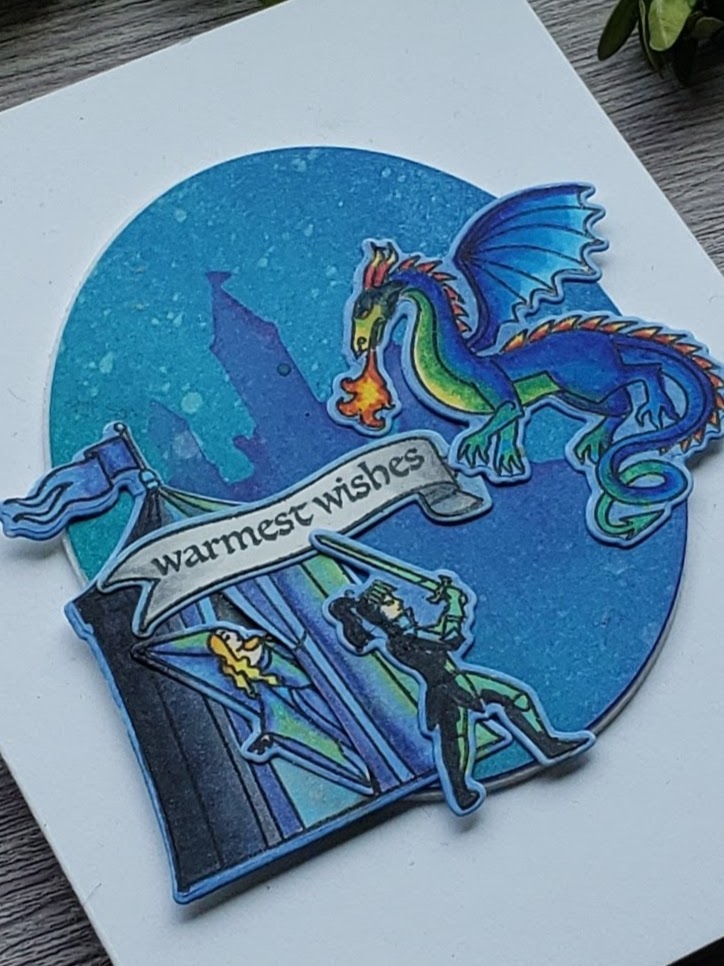
Using one of the negative scraps from cutting out the castle fancy die, I stenciled in the castle using some Blue Hawaii Ink over the blended panel and a blender brush. Then, using an Infinity Die Oval I cut out a cameo of the panel and adhered it to a fun foam backing.
Next, I colored in the tent, princess, knight and dragon images using cooler colors with a bit of warmer colors for the fire and underbelly of the dragon. I die cut them out and adhered them to the front of the oval. I stamped a banner out from the set and added the sentiment in black ink. Because this is a night scene, I colored in the white border around the images with a blue Copic marker.
To finish off this card, I adhered it all to the front of an A2-sized card base!

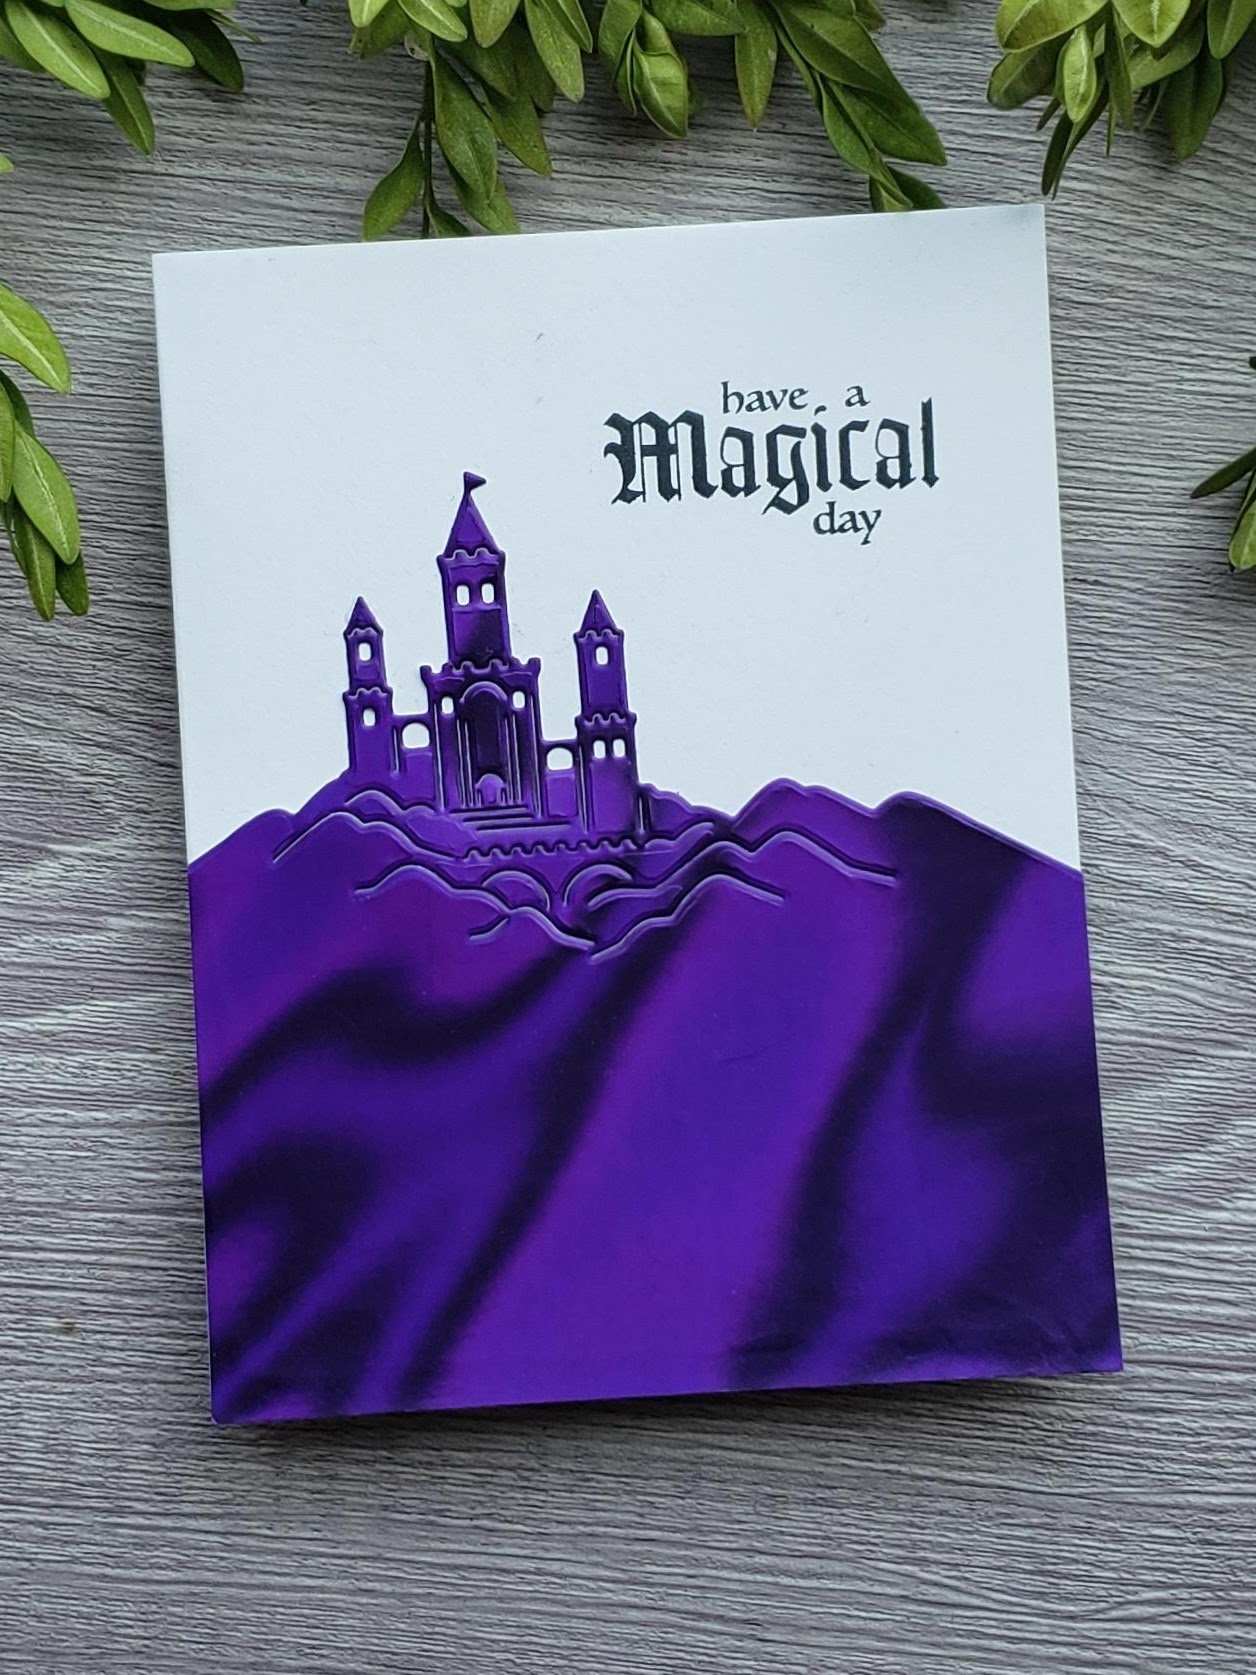
Card #3 — Done in 60 Seconds!!
Included in the kit is this absolutely beautiful Lava Purple Paper and a Fancy Castle Die. I die cut the purple paper out with the fancy die and stamped a sentiment in black near the top! I glued them to the front of the panel and I was done in 60 seconds!
Card #4 - Masked Scene Sans Dies
For my fourth and final card for the hop, I stamped out a royal court scene using some masking to fit the jester between Your Royal Highnesses. I stamped them out in an array, raising the middle three up on a platform I drew in with a Mono Drawing Pen. I colored in the background with Warm Grays and the images with warmer colors of orange, red and yellow.

For the sentiment, I heat embossed the words You Rule in gold. Then, I trimmed down the panel to 4 x 5.25” and popped it up on a landscaped A2-sized card base with some fun foam.

Thank you royally for hanging out with me today on the blog hop! I hope you enjoyed these cards and would love for you enjoy the kit along with me! If you are interested in the kit or supplies I have used, you will find a grid of supplies below for your convenience. You can choose where to purchase them by clicking on the name of the store next to the item. Thank you for using my affiliate links. They help me keep Del and Artie filled with inspiration for you and at no additional cost to you. For more about this, read my page, IF I INSPIRE YOU.
Here are the links to the rest of the hop!! You won’t want to miss the amazing inspiration coming your way!